Spring Boot AWS S3 연동하기 (presigned URL)
Spring Boot AWS S3 연동하기 (presigned URL) — #SpringBoot #개발자의도구들 #SpringBootAWS #AWSS3 #presignedURL #S3Presigned 아키텍...
#SpringBoot #개발자의도구들 #SpringBootAWS #AWSS3 #presignedURL #S3Presigned
아키텍처
깃허브 주소
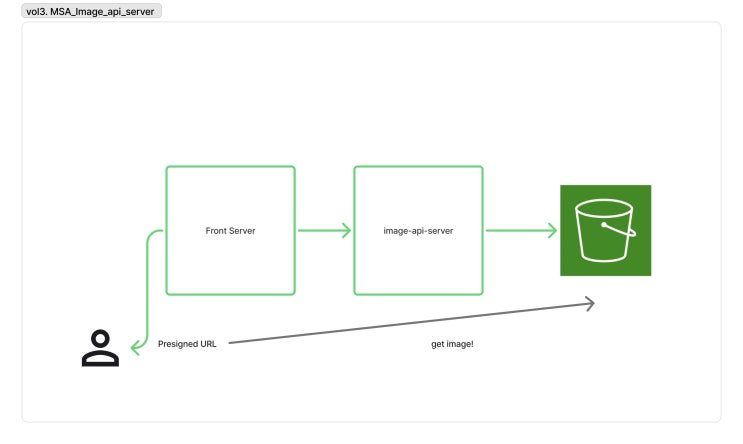
기존에 이미지 데이터를 로컬 폴더에 저장을 했었습니다. 이후 이미지를 안정적으로 저장,관리 하기 위해서 AWS S3에 이미지를 저장하는 API 서버를 따로 만들었습니다.
Flow
- user는 front에 이밎와 관련된 API 동작 호출
- front는 image-api-server에 전달
- image-api-server는 S3를 호출하여 이미지 관리
👉 이번 글에서는 image-api-server에 이미지를 저장하는 로직, presigned url을 발급하여 저장된 데이터를 가져오는 로직을 정리하였습니다.
이미지 저장
이미지를 S3에 성공적으로 저장하기 위해서 이미지와 관련된 메타데이터를 로컬 RDBMS에 따로 저장하였습니다.
image-meta-data 테이블을 구축하였습니다.
                                    CREATE TABLE `profile_image_metadata` (
  `id` bigint(20) NOT NULL AUTO_INCREMENT,
  `user_type` varchar(50) NOT NULL,
  `user_id` bigint(20) NOT NULL,
  `image_type` varchar(20) NOT NULL,
  `created_at` bigint(20) NOT NULL,
  `last_modified_at` bigint(20) NOT NULL,
  `original_file_name` varchar(255) NOT NULL,
  `content_type` varchar(100) NOT NULL,
  `size` bigint(20) NOT NULL,
  `bucket_name` varchar(255) NOT NULL,
  `s3_key` varchar(500) NOT NULL,
  PRIMARY KEY (`id`)
) ENGINE=InnoDB AUTO_INCREMENT=3 DEFAULT CHARSET=utf8mb4 COLLATE=utf8mb4_uca1400_ai_ci
                                    id: 고유 식별자
user_type  :   user는 두 분류 = advertiser & influencer
user_id    :   user의 고유 id
image_type :   profile의 경우 background랑 프로필 사진
bucket_name:   S3 버킷 이름
s3_key     :   개별 s3 고유 이미지 key
Image 저장을 위한 service 로직을 추가하였습니다.
                                    fun saveProfileImage(
        meta: MakeNewProfileImageRequest,
        file: MultipartFile
    ): SaveFileResult {

        return transaction {
            // Extract file metadata from MultipartFile using Tika
            val fileSize = file.size
            val originalFileName = file.originalFilename

            // Use Tika to detect the actual content type from file content
            val detectedContentType = tika.detect(file.inputStream, originalFileName)
            val contentType = detectedContentType ?: file.contentType ?: "application/octet-stream"

            // Generate unique S3 key
            val s3Key = "profile-images/${UUID.randomUUID()}-${UUID.randomUUID()}"
            val bucketName = "marketing-image-bucket"
            var s3UploadSuccessful = false

            try {
                val logger = KotlinLogging.logger {}
                // Upload file to S3
                val putObjectRequest = PutObjectRequest.builder()
                    .bucket(bucketName)
                    .key(s3Key)
                    .contentType(contentType)
                    .contentLength(fileSize)
                    .build()

                val response = s3Client.putObject(
                    putObjectRequest,
                    RequestBody.fromInputStream(file.inputStream, fileSize)
                )

                logger.info { "response: ${response}" }
                s3UploadSuccessful = true

                val createdId = profileImageMetaRepository.saveProfileImageMetadata(
                    ProfileImageMetadata.of(
                        userType = meta.userType,
                        userId = meta.userId,
                        profileImageType = meta.profileImageType,
                        originalFileName = originalFileName,
                        contentType = contentType,
                        size = fileSize,
                        bucketName = bucketName,
                        s3Key = s3Key
                    )
                )

                SaveFileResult.of(
                    id = createdId,
                    s3Key = s3Key,
                    bucketName = bucketName,
                    contentType = contentType,
                    size = fileSize,
                    originalFileName = originalFileName
                )
            } catch (e: S3Exception) {
              throw S3UploadException(
                  logics = "ProfileImageService.saveProfileImage",
                  message = e.message?: "S3 file uploading failed"
                  )
            } catch (e: Exception) {
                // Rollback: Delete S3 object if it was successfully uploaded
                if (s3UploadSuccessful) {
                    try {
                        val deleteObjectRequest = DeleteObjectRequest.builder()
                            .bucket(bucketName)
                            .key(s3Key)
                            .build()

                        s3Client.deleteObject(deleteObjectRequest)
                        looger.info { "Successfully deleted S3 object during rollback: $s3Key" }
                    } catch (deleteException: Exception) {
                        looger.error(deleteException) {
                            "Failed to delete S3 object during rollback: $s3Key"
                        }
                    }
                }
                throw RuntimeException("Failed to save profile image: ${e.message}", e)
            }
        }
    }
참고사항
📌 size, orfinalFileName은 MultipartFile내에서
📌 content-type은 tike 라이브러리를 사용하여 서버에서 직접 추출
📌 s3 업로드 및 메타데이터 함께 업로드
🚀 관리 편의성을 위해서 하나라도 실패하면 저장을 rollback할 로직을 추가함
- Exception도 종류별로 최대한 나눠서 처리해주면 좋다.
이미지 저장 테스트
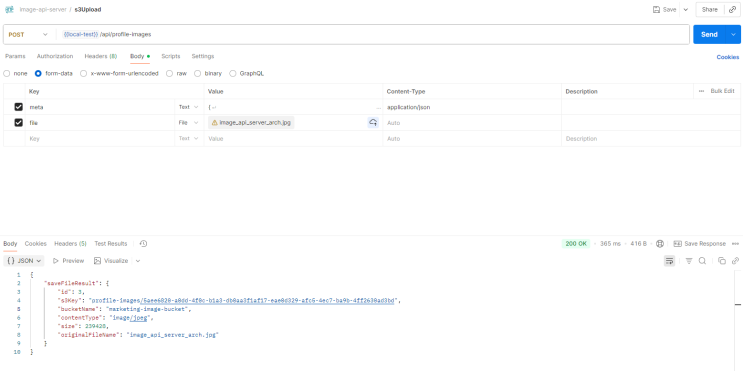
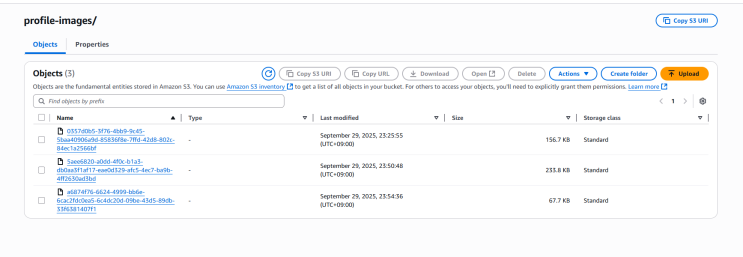
S3에 성공적으로 데이터가 들어갑니다.
이미지 가져오기
S3 Bucket에는 두 유형의 버킷이 존재합니다.
- Public Bucket: 모든 사람이 접근가능
- Private Bucket: 허가된 사람만 접근가능
프로필 이미지의 경우 로그인하지 않은 유저도 볼 수 있는 것이 일반적입니다. 그래서 처음에는 Public을 생각했습니다.
하지만, AWS는 outbound 트래픽을 부과하기 때문에, S3 퍼블릭 주소가 유출된다면, 공격대상이 되어 요금 폭탄을 맞을 수 도 있을 것 같았습니다.
그래서 그냥 서버에서만 접근 가능하도록 Private로 버킷을 두고, presigned URL을 발급하는 방법을 사용했습니다.
서비스 코드입니다.
                                    fun getProfileImage(
        userId: Long,
        userType: UserType
    ): List<ProfileImageMetadataWithUrl> {
        return transaction {
            // 1. Find bucket-key from profile-image-metadata by userId and userType

            val profileImageMetaDataEntities: List<ProfileImageMetadataEntity> =
                profileImageMetaRepository.findProfileImageMetaDataByUserInfo(userId, userType)

            // 2. Make S3 presigned URL request using the key
            profileImageMetaDataEntities.map { entity ->
                val getObjectRequest = GetObjectRequest.builder()
                    .bucket(entity.bucketName)
                    .key(entity.s3Key)
                    .build()

                val presignRequest = GetObjectPresignRequest.builder()
                    .signatureDuration(Duration.ofMinutes(15)) // URL expires in 15 minutes
                    .getObjectRequest(getObjectRequest)
                    .build()

                val presignedUrl = s3Presigner.presignGetObject(presignRequest).url().toString()
                ProfileImageMetadataWithUrl.of(
                    presignedUrl = presignedUrl,
                    bucketName = entity.bucketName,
                    s3Key = entity.s3Key,
                    contentType = entity.contentType,
                    size = entity.size,
                    originalFileName = entity.originalFileName
                )
            }
        }
    }
- 메타 데이터에 저장된 S3\_key를 사용하여 presignedURL 발급이 가능합니다.
- 이를 사용하면 지정 시간동안 어떤 유저든 해당 이미지로 접근이 가능합니다.
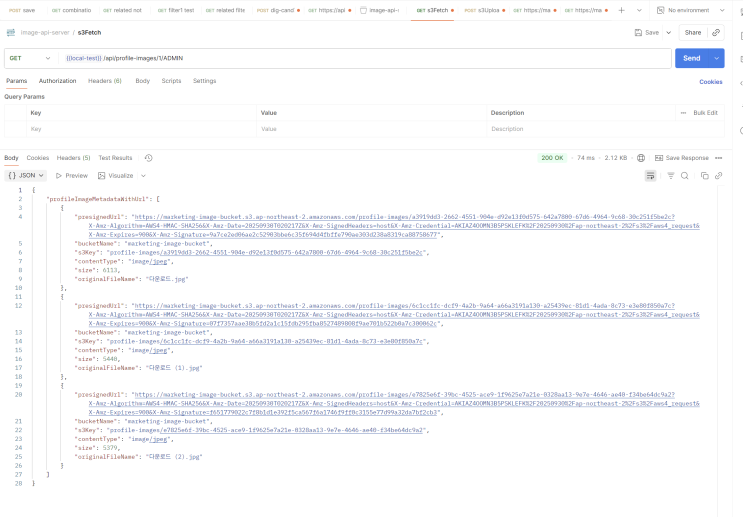
- presigned url이 발급되었습니다.
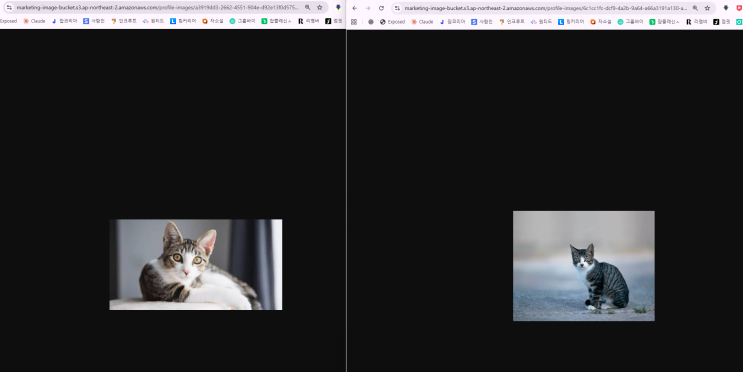
- 웹브라우저에서 버킷에 저장된 이미지에 접근이 가능합니다.
trouble Shooting
🤔 enum 클래스로 직접 Table로 매핑하고 있는데 왜 Int로 들어갈까?
- enum에 val code: Int를 선언하면 자동으로 Int로 변환되어서 들어간다.
                                    object ProfileImageMetadataTable : BaseDateLongIdTable("profile_image_metadata") {
    val imageType: Column<ProfileImageType> = enumeration("image_type", ProfileImageType::class)
}

enum class ProfileImageType(val code: Int) {
    BACKGROUND(1),
    PROFILE(2);

    companion object {

        private val valueToCodeMap: Map<String, Int> = entries.associate { it.name to it.code}
        private val codeToEnumMap: Map<Int, ProfileImageType> = entries.associateBy { it.code }

        fun getByCode(code: Int): ProfileImageType? {
            return codeToEnumMap[code]
        }

        fun getCodeByValue(value: String): Int? {
            return valueToCodeMap[value]
        }
    }
}
ProfileImageType을 사용해서 BACKGROUND 형태로 들어갈 것 같지만, Int로 자동변환해서 들어간다.
👉 enumerationByName()을 사용하면 Varchar로 들어간다!