kotling Spring JPA Auditing 기능 모음(@CreatedDate @LastModifiedDate @CreateBy)
kotling Spring JPA Auditing 기능 모음(@CreatedDate @LastModifiedDate @CreateBy) — #kotlin #kotlinspring #코틀린스프링 #springAuditing #스프링JPA #JPAauditing #개발자의도구들 ...
#kotlin #kotlinspring #코틀린스프링 #springAuditing #스프링JPA #JPAauditing #개발자의도구들
🚨📝 📖 📒✏️💡🔍

AI스쿨 msa기반 java 백엔드 코스 중에 공부한 내용을 작성하였습니다
\* 현재 Spring 프로젝트를 진행 중입니다. 전체적인 목차를 보시려면 여기를 눌러주세요.
Data 생성날짜를 기록하자
모든 데이터에 대해 생성날짜를 궂이 기록할 필요는 없겠지만, 게시글과 같이 시간을 중요한 정보로 보는 데이터에 대해서는 생성 날짜를 적어주는게 좋습니다.
보통은 서버에서 현재 날짜를 발급하여 테이블에 같이 저장하는 방식으로 구현합니다. 기존에는 직접 시간 발급 로직을 구현하였었는데, 매번 필요할 때마다 로직을 작성하는게 매우 번거로웠습니다.
| 🙅 참고로 Client가 보내는 생성날짜를 DB에 저장해서는 안됩니다. 클라이언트의 데이터는 조작될 수 있기 때문입니다. |
|---|
하지만 Spring JPA Auditing 기능을 사용하면 이런 번거로움을 줄일 수 있습니다.
Spring Auditing 적용하기
Spring에서 사용하는 Auditing 기능은 대표적으로 4가지로 볼 수 있습니다. 생성날짜, 수정날짜, 생성자 추적, 수정자 추적. 하지만 사실상 사용되는 기능은 생성날짜 및 수정날짜입니다.
build.gradle
                                    dependencies {
    implementation("org.springframework.boot:spring-boot-starter-data-jpa")
}
spring jpa 의존성을 추가합니다.
@Annotaions
Auditing에서 지원하는 Anootation을 정리했습니다.
| @EntityListeners(AuditingEntityListener.class): 이 리스터가 있어야 Auditing 기능이 정상적으로 작동한다. @CreatedData: 엔티티가 처음 생성될 때 자동으로 현재 시간이 설정된다. @LastModifiedDate: 엔티티가 수정될 때 자동으로 현재 시간이 설정된다. @CreateBy: 엔티티가 처음 생성될 때 생성자를 자동으로 설정한다. @LastModifiedBy: 엔티티가 수정될 때 수정자를 자동으로 설정한다. |
|---|
해당 @ 사용 위치는 아래 코드를 보시면 이해할 수 있습니다.
Application class
Spring project를 시작하는 entry point에 @EnableJapAuditing을 설정합니다.
                                    @SpringBootApplication
@EnableJpaAuditing  // Auditing 관련 @ 추가하기
public class MyApplication {
     public static void main(String[] args) {
        SpringApplication.run(MyApplication.class, args);
    }
}
Entity
JPA에서 생성하는 Entity column에 Auditing annotation을 적용하면 됩니다.
                                    package com.example.frontServer.entity

import com.example.frontServer.enum.BoardType
import jakarta.persistence.*
import org.springframework.data.annotation.CreatedBy
import org.springframework.data.annotation.CreatedDate
import org.springframework.data.annotation.LastModifiedDate
import org.springframework.data.jpa.domain.support.AuditingEntityListener
import java.time.LocalDateTime

@Entity
@Table(name = "boards")
@EntityListeners(AuditingEntityListener::class)
data class Board (
    @Id @GeneratedValue(strategy = GenerationType.IDENTITY)
    var id: Long? = null,

    val writer : String,

    @Column(name = "text_content")
    var textContent: String,

    @Column(name="img_url")
    var imgUri: String? = null, // filesystem url

    @CreatedDate
    @Column(name = "first_writing_time")
    var firstWritingDate: LocalDateTime? = null,

    @LastModifiedDate
    @Column(name = "last_modified_time")
    var lastModifiedDate: LocalDateTime? = null,

    @Column(name = "reading_count")
    var readingCount : Long,

    @Column(name = "like_count")
    var likeCount: Long = 0,

    @Enumerated(EnumType.STRING)
    var type: BoardType,

    @Column(name = "parent_id")
    var parentId: Long? = null,

)
BoardEntity의 경우 생성날짜와 수정날짜를 적어주는게 좋기 때문에 이렇게 설정하였습니다. 기본 설정이 null로 되어 있는데 이건 kotlin언어 한계상 이렇게 설정할 수 밖에 없습니다. 데이터 생성시 자동으로 현재 시간으로 변경하여 DB에 넣어주니 걱정하지 않아도 됩니다.
Database
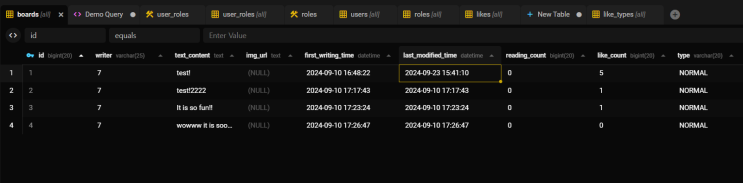
DB에 잘들어가는 것을 볼 수 있습니다.
@CreatedBy
현재기능은 잘 사용되지 않지만, 그래도 진행을 했었기 때문에 간단하게 코드로 남겨볼까 합니다.
                                    package com.example.frontServer.config

import com.example.frontServer.repository.UserRepository
import io.github.oshai.kotlinlogging.KotlinLogging
import org.springframework.context.annotation.Bean
import org.springframework.context.annotation.Configuration
import org.springframework.data.domain.AuditorAware
import org.springframework.security.core.Authentication
import org.springframework.security.core.context.SecurityContextHolder
import org.springframework.security.core.userdetails.User

import java.util.*

@Configuration
class AuditorAwareConfig(
    private val userRepository: UserRepository
) {
    private val logger = KotlinLogging.logger {}
    @Bean
    fun auditorProvider(): AuditorAware<com.example.frontServer.entity.User> {
        return AuditorAware<com.example.frontServer.entity.User> {
            val authentication: Authentication? = SecurityContextHolder.getContext().authentication

            if (authentication == null || !authentication.isAuthenticated) {
                logger.info {"No authenticated user found"}
                Optional.empty()
            } else {
                val principal = authentication.principal

                if (principal is User) {
                    logger.info { "Authenticated user: ${principal.username}" }  // user 객체로 캐스팅된 후 username 접근
                    Optional.of(userRepository.findByUsername(principal.username)!!)
                } else {
                    logger.info { "Principal is not of type User: $principal" }
                    Optional.empty()
                }
            }
        }
    }
}
Auditing 관련 설정을 해줘야 합니다. 이때 AuditoProvider에서 Spring Security에서 인증된 Authentication을 참고하여 User를 추적하여 제공하고 있습니다.
                                    package com.example.frontServer.entity

import com.example.frontServer.enum.BoardType
import jakarta.persistence.*
import org.springframework.data.annotation.CreatedBy
import org.springframework.data.annotation.CreatedDate
import org.springframework.data.annotation.LastModifiedDate
import org.springframework.data.jpa.domain.support.AuditingEntityListener
import java.time.LocalDateTime

@Entity
@Table(name = "boards")
@EntityListeners(AuditingEntityListener::class)
data class Board (
    @Id @GeneratedValue(strategy = GenerationType.IDENTITY)
    var id: Long? = null,

    @CreatedBy
    @OneToOne
    var writer : User? = null,

    @Column(name = "text_content")
    var textContent: String,

    @Column(name="img_url")
    var imgUri: String? = null, // filesystem url

    @CreatedDate
    @Column(name = "first_writing_time")
    var firstWritingDate: LocalDateTime? = null,

    @LastModifiedDate
    @Column(name = "last_modified_time")
    var lastModifiedDate: LocalDateTime? = null,

    @Column(name = "reading_count")
    var readingCount : Long,

    @Column(name = "like_count")
    var likeCount: Long = 0,

    @Enumerated(EnumType.STRING)
    var type: BoardType,

    @Column(name = "parent_id")
    var parentId: Long? = null,

)
이런식으로 해두면 인증된 사용자를 인식하고 Spring이 알아서 User Entity의 Id값을 DB에 넣어줍니다. (ORM은 무조건 PK 값을 넣습니다)
대안책
@CreateBy대신 사용하기 보다는 Spring controller에서 AuthenticationPricipal을 바로 받아 볼 수 있습니다.
                                    @PostMapping("/board")
    fun save(
        @Valid @RequestBody saveBoardRequest: SaveBoardRequest,
        @AuthenticationPrincipal user: AuthUserDetails
    ): ResponseEntity<String> {
        val message = boardService.save(saveBoardRequest, user.getUserId())
        return ResponseEntity.ok().body(message)
    }
이런식으로 설정해두면, 내가 custom한 UserDetails class를 알아서 Controller에 넣어줍니다. 여기에서 userId값을 가져오면 됩니다. UserDetails 부분은 조금 더 깊은 공부가 필요해서 여기에 따로 저장해두었습니다.
이후에는 @CreatedBy없이 그냥 BoardService에서 save해줄 때 같이 넣어주면 됩니다.
                                     fun save(request: SaveBoardRequest, userId: Long) : String {
        return try {
            var imgUrl : String? = null
            if (request.imgFile != null && !request.imgFile.isEmpty) {
                imgUrl = saveFile(request.imgFile)
            }

            val board = Board(
                writer = userId,
                textContent = request.textContent,
                imgUri = imgUrl,
                readingCount = 0,
                likeCount = 0,
                type = BoardType.NORMAL
            )
            boardRepository.save(board)
            "save board successfully"
        } catch (e: Exception) {
            throw e
        }
    }
\* 이미지 로직은 무시해주세요, 미완성입니다.
| 🫢시행착오처음에 username을 받아서 넣어줬는데(unique 키라서), 생각해보니 username이 primary key가 아니어서 변경이 언제든지 가능합니다. 현재 외래키를 DB에서 설정하지 않았기 때문에(개념적 외래키 사용), usernmae이 변경되면 모든 테이블을 추적해서 변경해줘야하는 overhead가 발생한다는 것을 뒤늦게 깨달았습니다.다른 테이블의 foreign key는 항상 Primary key로 넣어줍시다! |
|---|