웹 서버 구현 (소켓통신, HTTP/1,1)
웹 서버 구현 (소켓통신, HTTP/1,1) — #웹서버소켓통신 #웹서버TCP #TCP소켓통신 #개발자의 도구들 학습 목표 웹 서버에 필요한 TCP 소...
#웹서버소켓통신 #웹서버TCP #TCP소켓통신 #개발자의 도구들
학습 목표
- 웹 서버에 필요한 TCP 소켓 통신 공부 범위를 정한다.
- TCP 소켓에서 받은 HTTP 요청 패킷을 파싱한다.
- TCP 소켓으로 HTTP 응답 패킷을 보낸다.
공부 범위 지정
웹 서버를 만들기 위해 TCP에 대해 모든 것을 알아야하는 것이 아닙니다.
                                    ┌─────────────────────────────────────────
│  Application Layer (HTTP)                 ← 우리가 직접 구현할 부분
│  - HTTP 요청/응답 파싱
│  - 비즈니스 로직
├─────────────────────────────────────────
|                                           ← Socket(Java Socket API): Socket을 추상화
|─────────────────────────────────────────
│  Transport Layer (TCP)                    ← OS가 추상화(BSD Socket 등)
│  - 연결 관리 (3-way handshake)
│  - 데이터 전송 보장
│  - 포트 번호로 애플리케이션 구분
├─────────────────────────────────────────
│  Internet Layer (IP)                      ← OS가 처리
│  - 라우팅, 주소 지정
├─────────────────────────────────────────
│  Network Access Layer                     ← 하드웨어/드라이버
다행히도 네트워크 레이어가 잘 나눠져 있기 때문에, 우리는 Applcation Layer만 집중적으로 공부하면 된다. 3-way handshake 같은 부분은 Java Socket API가 이미 다 추상화 해두었습니다.
해당 레이어에서 공부하게될 대표적인 부분은 바로
- HTTP 프로토콜 파싱
- 파싱 이후 비즈니스 로직 수행
이 중에서도 이번글에서 집중적으로 다루고자 하는 내용은 바로 HTTP 프로토콜 파싱입니다.
Java Socket API
Trnasport Layer는 Java Socket API가 추상화 해두었기 때문에, 이 API에 대해 깊게 알아두면 프로젝트를 진행하는데 있어서 도움이 될거라고 판단했습니다.
서버측에서 고려해야할 주요 클래스는 다음 두가지입니다.
- ServerSocket
- Socket
📌 ServerSocket Class
소켓 생성 및 연결을 담당하는 Class이다.
                                    // 포트 바인딩
ServerSocket server = new ServerSocket(8080);

// 연결 종료
server.close()
server는 포트만 지정하면 기본적으로 모든 네트워크 인터페이스(0.0.0.0)에 바인딩됩니다. 즉 어떤 클라이터든 내 컴퓨터 IP:Port로 접근이 가능합니다.
Localhost로만 접근이 가능하게 하고 싶다면 아래와 같이 사용하면 됩니다.
                                    // 포트 바인딩
ServerSocket server = new ServerSocket(8080, 50, InetAddress.getByName("127.0.0.1"));
📌 Socket Class
데이터 송수신을 담당하는 클래스입니다.
                                    // client 소켓 연결하기
Socket client = server.accept();

// 데이터 읽기
InputStream in = socket.getInputStream();
BufferedReader reader = new BufferedReader(
    nwe InputStreamReader(in, StandardCharsets.UTF_8)
);

// 쓰기
OutputStream out = socket.getOutputStream();
PrintWriter writer = new PrintWriter(out, true); // auto-flush
기본 메서드
                                    // 데이터 입출력
InputStream getInputStream();
OutputStream getOutputStream();

// 연결 관리
void close();                  // 연결 종료
boolean isClosed();            // 종료 여부
boolean isConnected();         // 연결 여부

// 옵션
void setSoTimeout(int ms)      // 읽기 타임아웃
void setTcpNoDeply(boolean on) // Nagle 알고리즘 on/off
void setKeepAlive(boolean on)  // TCP Keep-Alive

// 정보 조회
InetAddress getInetAddress()   // 클라이언트 IP
int getPort()                  // 클라이언트 포트
소켓 통신 테스트 코드
                                    @NoArgsConstructor
public class Server {

    public void start() {
        int port = 8080;

        try (ServerSocket serverSocket = new ServerSocket(port, 50, InetAddress.getByName("127.0.0.1"))) {
            System.out.println("서버가 포트 " + port + "에서 대기 중...");

            while (true) {
                Socket client = serverSocket.accept();

                System.out.println("클라이언트가 연결됨: " + client.getInetAddress().getHostName());

                client.setSoTimeout(5000);
                System.out.println("클라이언트 연결을 닫습니다");
                client.close();
                System.out.println("클라이언트 연결 종료?: " + client.isClosed());
            }
        } catch (IOException e) {
            System.err.println("IOException: " + e.getMessage());
        }
    }
}
웹 브라우저나 Postman으로 테스트 해보면 커넥션이 잘되는 것을 볼 수 있습니다.
                                    서버가 포트 8080에서 대기 중...
클라이언트가 연결됨: 127.0.0.1
클라이언트 연결을 닫습니다
클라이언트 연결 종료?: true
HTTP Request Parsing: Essential
소켓 통신에서는 스트림을 사용하여 데이터를 바이트 단위의 연속된 흐름으로 처리합니다. HTTP/1.1 요청 메세지가 들어오면 일련의 바이트를 읽어들여 파싱하는 과정이 필요합니다.
HTTP/1.1 요청은 아래와 같이 3부분으로 구성되어있습니디.
                                    GET /api/data HTTP/1.1           ← Request Line
HOST: localhost:8080             ← Header
Content-Type: application/json   ← Header
Content-Length: 27               ← Header
       ...
                                 ← 빈 줄 (CRLF)  🎯 필수적으로 헤더 종결자를 인식해야함!
{"name":"test", "value":123}     ← Body (optional)
⚠️ HTTP/1,1 주의 사항
- 라인 끝: \\r\\n
- 헤더 끝: \\r\\n\\r\\n
                                    // line 인식 처리
BufferedReader reader = new BufferedReader(
    new InputStreamReader(inputStream, StandardCharsets.UTF_8)
);

String line = reader.readline(); // String 형태로 만들어주는 편리한 기능
요청 메세지는 클라이언트에서 만들어서 보내기 때문에, 서버 측에서는 형식(rule)에 맞게 파싱하고 필요한 정보만 캐치하면 됩니다.
위에 요약된 HTTP/1.1 요청 예시는 가장 중요하게 파싱해야할 요소들만 포함하고 있습니다.
Request Line
GET /api/data HTTP/1.1 ← Request Line
가장 첫번째 라인이자 근본 라인입니다. 여기서 HTTP/1.1 프로토콜 확인, 메서드 확인, URI를 확인하기 때문에 없다면 HTTP/1.1이 아니라 간주하고 처리하지 않아도 됩니다.
Header Line
                                    ----------- Request Line -----------------
HOST: localhost:8080             ← Header
Content-Type: application/json   ← Header
Content-Length: 27               ← Header
                                 ← empty(🚀essential)
두번째 줄부터 마지막 공백 줄까지 모두 Header 라인입니다. 파싱해서 key-value 형태로 저정해두면 참고하기 좋습니다.
Host의 경우 HTTP/1.1에서 필수로 지정하라고 약속된 헤더이기 때문에 반드시 클라이언트에서 포함시켜야 합니다.
- 없다면 400 Bad Request 반환
프로토콜에 Body가 들어있다면, 반드시 Content-Type 및 Content-Length를 요청측에서 보내야 합니다. 특히나 Content-Length를 입력하지 않는다면, 데이터 스트림의 특성상 어디까지 Body인지 알지 못합니다.
🔥 기타 권장 헤더
                                    Connection: keep-alive         ← 연결 유지할지 결정: 성능 튜닝
Accept: application/json       ← 클라이언트가 원하는 응답 형식
User-Agent: Mozilla/5.0        ← 특정 브라우저별 대응이 가능
🚀 심화
                                    Authorization: Bearer {token}           ← 회원 기능
Cookie: sessionId=abc123; userId=42     ← 세션기반 인증, 사용자 추적
Origin: https://frontend.example.com    ← CORS 정책 적용하기 위해서
Transfer-Encoding: chunked              ← Content-Lenght를 모를 때 (스트리밍, 동적 생성)
한번에 모든걸 다하기는 어려우니, 가장 기본적인 파싱과정 부터 실행해 봅시다.
🎯 Body
패킷에서 Body를 읽기 위한 방법
- Content-Length를 읽어들인다.
- 해당 길이 만큼 InputStream에서 데이터를 읽는다.
Body는 우선 String으로 읽어들인 후 Json으로 이후에 변환할 예정입니다.
HTTP Request Parsing: Essential Code
특수한 경우가 아니라면 parsing에 필요한 알고리즘을 직접 개발할 필요가 없습니다. MVP 원칙에 따라 이미 유명한 알고리즘은 웹 검색 혹은 GPT와 같은 GenAI를 통해서 빠르게 개발을 진행할 수 있습니다.
그보단 서버를 안정적으로 설계하는데에 집중합시다.
Server
                                    @AllArgsConstructor
public class Server {
    private final HttpRequestParser httpRequestParser;

    public void start() {
        int port = 8080;
        try (ServerSocket serverSocket = new ServerSocket(port, 50, InetAddress.getByName("127.0.0.1"))) {
            System.out.println("서버가 포트 " + port + "에서 대기 중...");

            while (true) {
                Socket client = serverSocket.accept();
                InputStream in = client.getInputStream();
                System.out.println("클라이언트가 연결됨: " + client.getInetAddress().getHostName());

                // input
                BufferedReader reader = new BufferedReader(
                        new InputStreamReader(in, StandardCharsets.UTF_8)
                );
                String requestLine = reader.readLine();

                // get requestLine parts
                List<String> requestParts = httpRequestParser.parseRequestLine(requestLine);

                // parse URI

                // Read header lines
                List<String> headerLines = new ArrayList<>();
                String line;
                while ((line = reader.readLine()) != null && !line.isEmpty()) {
                    headerLines.add(line);
                }
                HashMap<String, String> headers = httpRequestParser.parseHeaders(headerLines);

                // ⚠️ missing error handling
                String contentLengthStr = headers.get("Content-Length");
                if (contentLengthStr != null) {
                    int contentLength = Integer.parseInt(contentLengthStr);
                    char[] bodyBuf = new char[contentLength];
                    int totalRead = 0;

                    while (totalRead < contentLength) {
                        int charsRead = reader.read(bodyBuf, totalRead, contentLength - totalRead);
                        if (charsRead == -1) break;
                        totalRead += charsRead;
                    }

                    String body = new String(bodyBuf, 0, totalRead);
                    System.out.println("Body: " + body);
                }

                System.out.println("requestLine: " + requestParts.toString());
                System.out.println("Headers: " + headers);
                client.setSoTimeout(5000);
                System.out.println("클라이언트 연결을 닫습니다");
                client.close();
                System.out.println("클라이언트 연결 종료?: " + client.isClosed());
            }
        } catch (IOException e) {
            System.err.println("IOException: " + e.getMessage());
        }
    }
}
Request Line
                                    // GET /api/data HTTP/1.1           ← Request Line

public List<String> parseRequestLine(String requestLine) {
        // BufferedReader => String으로 바로 읽어들임
        // requestLine example:
        // GET /index.html HTTP/1.1\r\n

        String[] requestLineParts = requestLine.split(" ");
        if (requestLineParts.length != 3) {
            return null;
        }

        // requestLineParts[0] = method (GET, POST, etc.)
        // requestLineParts[1] = path (/index.html)
        // requestLineParts[2] = version (HTTP/1.1)
        return List.of(requestLineParts[0], requestLineParts[1], requestLineParts[2].trim());
    }
Headere Parsing
                                    /*
* ----------- Request Line -----------------
* HOST: localhost:8080             ← Headers
* Content-Type: application/json   ← Headers
* Content-Length: 27               ← Headers
                                   ← empty(🚀essential)
*/

public HashMap<String, String> parseHeaders(List<String> headerLines) {
        // headerLine example:
        // Host: localhost:8080
        // User-Agent: Mozilla/5.0
        // Accept: text/html

        HashMap<String, String> headers = new HashMap<>();

        for (String line : headerLines) {
            if (line == null || line.trim().isEmpty()) {
                continue;
            }

            int colonIndex = line.indexOf(":");
            if (colonIndex > 0) {
                String key = line.substring(0, colonIndex).trim();
                String value = line.substring(colonIndex + 1).trim();
                headers.put(key, value);
            }
        }

        return headers;
    }
Body
                                    // ⚠️ missing error handling
String contentLengthStr = headers.get("Content-Length");
if (contentLengthStr != null) {
    int contentLength = Integer.parseInt(contentLengthStr);
    char[] bodyBuf = new char[contentLength];
    int totalRead = 0;

    while (totalRead < contentLength) {
        int charsRead = reader.read(bodyBuf, totalRead, contentLength - totalRead);
        if (charsRead == -1) break;
        totalRead += charsRead;
    }

    String body = new String(bodyBuf, 0, totalRead);
    System.out.println("Body: " + body);
}
- ⚠️ 다른 InputStream으로 읽을 필요없음: 아래 오류 참고
- BufferedReader가 스트림에 들어온 데이터를 이미 읽어버림
- 8KB(기본 버퍼 크기) 단위로 미리 내부 버퍼에 저장해두고 있다.
들어온 Body는 현재 String인데 이후 적절한 형식으로 변환 후 처리해줘야 합니다.
테스트 결과
                                    클라이언트가 연결됨: 127.0.0.1
Body: {
    "id": "hello"
}
requestLine: [GET, /, HTTP/1.1]
Headers: {User-Agent=PostmanRuntime/7.48.0, Connection=keep-alive, Postman-Token=9a3cc659-5e95-46a2-8f25-b299a39e7a7c, Host=localhost:8080, Accept-Encoding=gzip, deflate, br, Content-Length=23, Content-Type=application/json}
클라이언트 연결을 닫습니다
클라이언트 연결 종료?: true
HTTP/1.1 Response Packet
간단하게 HTTP/1.1 패킷을 만들어 응답하는 코드를 작성하겠습니다.
다음사항을 주목하여 주세요.
- HTTP/1.1 응답 기본 형식
- 필수헤더
                                    // 🎯 심플응답
HTTP/1.1 200 OK                       ← Status Line
Content-Type: text/plain              ← Header
Date: Sun, 05 Oct 2025 10:30:00 GMT   ← Header
Connection: keep-alive                ← Header
Content-Length: 12                    ← Header
                                      ← empty(🚀 essential)
Hello World!                          ← Body
Status-Line
요청과 마찬가지로 가장 첫줄에 무조건 필수적으로 포함시켜야 하는 라인입니다.
                                    /*
* HTTP-Version Status-Code Response-Phrase
*/
HTTP/1.1 200 OK
Response-Header
요청과 마찬가지로 \\r\\n으로 구분되며 헤더의 끝은 \\r\\r입니다.
                                    ----- Status-Line -------
Content-Type: text/plain                ← Header
Date: Sun, 05 Oct 2025 10:30:00 GMT     ← Header
Connection: keep-alive                  ← Header
Content-Type: text/html; charset=UTF-8  ← Header
Content-Length: 12                      ← Header
                                        ← empty(🚀 essential)
Hello World!    👉 body
🔥 필수 헤더
- 스택상 반드시 포함해야 하는 헤더들
                                    Date: Sun, 05 Oct 2025 10:30:00 GMT      ← 응답이 생성된 시각
Content-Length                           ← Body가 존재하면 반드시 포함
🚀 강력 추천 헤더
- 실무에서 거의 항상 포함해야하는 헤더들
- Content-type
                                    Content-Type: text/html; charset=UTF-8   ← 응답 본문의 MIME타입

/* 주요 타입
* text/html; charset=UTF-8
* text/plain; charset=UTF-8
* application/json
* application/xml
* application/octet-stream  (바이너리 파일)
* image/jpeg, image/png, image/gif
* text/css
* application/javascript
*/
2. Connection
                                    Connection: keep-alive
Connection: close
HTTP/1.1에서는 keep-alive가 기본입니다.
3. Server
                                    Server: MyWebServer/1.0
Server: Apache/2.4.41
서버 정보
나머지 헤더들은 기능에 맞게 조사해서 추가해주면 됩니다.
HTTP/1.1 Response (Labs)
이번글은 아주 간단한 HTTP/1.1 패킷을 만들어 클라이언트에게 보내겠습니다.
핵심 API
📌 OutputStream
                                    Socket client = serverSocket.accept();
OutputStream out = client.getOutputStream();
- InputStream과 마찬가지로 Socket별로 OutputStream을 열어줍니다.
- Byte로 응답을 전송해줘야 합니다.
📌 입력을 하는 여러가지 방법
- OutputStream에 직접하기
- OutputStreamWriter 사용하기
- PrintWriter 사용하기 (🔥 추천!)
👉. OutputStream에 직접 바이너리 데이터 쓰기
String response = "HTTP/1.1 200 OK\r\n\r\nHello From My Server!";
byte[] bytes = response.getBytes(StandardCharsets.UTF_8);
out.write(bytes);
out.flush(); // 버퍼를 꼭 비워줘야 한다.
👉 OutputStreamWriter 사용
                                    OutputStreamWriter writer = new OutputStreamWriter(out, StandardCharsets.UTF_8);

writer.write("HTTP/1.1 200 OK\r\n");
writer.write("Content-Type: text/plain\r\n");
writer.write("\r\n");
writer.write("Hello World");
writer.flush();
- 문자열을 자동으로 바이트로 변환해준다.
- 편하다
- 인코딩도 지정할 수 있다.
👉 PrinterWrtier 사용(🔥)
                                    PrintWriter writer = new PrintWriter(
    new OutputStreamWriter(out, StandardCharset.UTF_8),
    true  // autoFlush
);

writer.print("HTTP/1.1 200 OK\r\n");
writer.print("Content-Type: text/html\r\n");
writer.print("\r\n");
writer.print("<h1>Hello World</h1>");
- pirnt(), println() 메서드 제공
- printf() 형식 지원
- autoFlush 기능 등
                                    OutputStream out = client.getOutputStream();

// Headers
String body = "Hello From Server!";
byte[] bodyBytes = body.getBytes(StandardCharsets.UTF_8);
writer.print("Content-Type: text/html; charset=UTF-8\r\n");
writer.print("Content-Length: " + bodyBytes.length + "\r\n");
writer.print("Connection: close\r\n");
writer.print("\r\n");  // 빈 줄
writer.flush(); // Header 먼저 보내기

out.write(bodyBytes);
out.flush();
📌결과
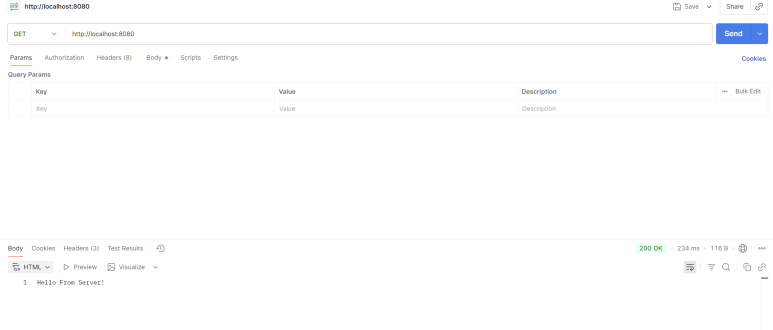
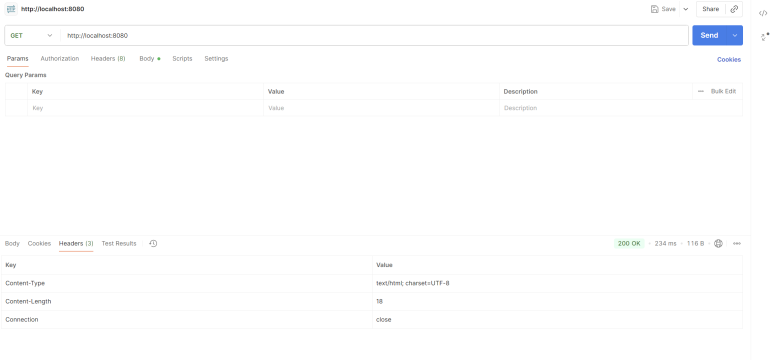
서버에서 생성한 응답 패킷이 잘 도착한 것을 볼 수 있습니다.
마치며
지금껏 Socket 통신으로 HTTP/1.1 요청 파싱, 응답 생성을 하는 방법에 대해 알아보았습니다. 개발하고 느낀 핵심 내용을 아래 요약했습니다.
- 프로토콜은 결곡 서버와 클라이언트의 소통도구
- 헤더, Body 등 필요한 정보를 건내는 것일 뿐
- 프로토콜 정보를 조작하면 커스터마이징한 서버 완성
-
- 커스텀 헤더 추가하여 원하는 로직을 만들어 낼 수 있지 않을까? 라는 기대감이 생김
결과 코드: https://github.com/keyveloper/markdown\_web\_server/tree/basic
Trouble Shooting
오류 발생 코드
                                    @AllArgsConstructor
public class Server {
    private final HttpRequestParser httpRequestParser;

    public void start() {
        int port = 8080;
        try (ServerSocket serverSocket = new ServerSocket(port, 50, InetAddress.getByName("127.0.0.1"))) {
            System.out.println("서버가 포트 " + port + "에서 대기 중...");

            while (true) {
                Socket client = serverSocket.accept();
                InputStream in = client.getInputStream();
                System.out.println("클라이언트가 연결됨: " + client.getInetAddress().getHostName());

                // input
                BufferedReader reader = new BufferedReader(
                        new InputStreamReader(in, StandardCharsets.UTF_8)
                );
                String requestLine = reader.readLine();

                // get requestLine parts
                List<String> requestParts = httpRequestParser.parseRequestLine(requestLine);

                // parse URI

                // Read header lines
                List<String> headerLines = new ArrayList<>();
                String line;
                while ((line = reader.readLine()) != null && !line.isEmpty()) {
                    headerLines.add(line);
                }
                HashMap<String, String> headers = httpRequestParser.parseHeaders(headerLines);

                // ⚠️ missing error handling
                String contentLengthStr = headers.get("Content-Length");
                if (contentLengthStr != null) {
                    int contentLength = Integer.parseInt(headers.get("Content-Length"));
                    byte[] bodyBuf = new byte[contentLength];
                    int totalRead = 0;
                    while (totalRead < contentLength) {
                        int bytesRead = in.read(bodyBuf, totalRead, contentLength - totalRead);
                        if (bytesRead == -1) break;
                        totalRead += bytesRead;
                    }

                    String body = new String(bodyBuf, 0, totalRead, StandardCharsets.UTF_8);
                    System.out.println("Body: " + body);
                }

                System.out.println("requestLine: " + requestParts.toString());
                System.out.println("Headers: " + headers);
                client.setSoTimeout(5000);
                System.out.println("클라이언트 연결을 닫습니다");
                client.close();
                System.out.println("클라이언트 연결 종료?: " + client.isClosed());
            }
        } catch (IOException e) {
            System.err.println("IOException: " + e.getMessage());
        }
    }
}
오류 발생 상황: 클라이언트에서 body를 보내면 무한 대기한다.
오류 원인: 한 클라이언트 내에서 InputStream read를 각각 사용해서
- BufferedReader
- body 파싱의 in.read()
발생 원인:
BuffredReader에서 inputStream을 사용하는데 이 버퍼는 기본단위인 8KB를 한번에 읽어들인 후 가지고 있다.
그런 상황에서 in.read()를 따로 호출하게 되면, 스트림의 모든 데이터가 소진되었으므로 읽을게 없이 무한 로딩상황이 발생한다.